
Setting up a VM with Linux for embedded software development takes some configuration. This is a sequel to another article. Here is the big picture of the setup we’re aiming for:
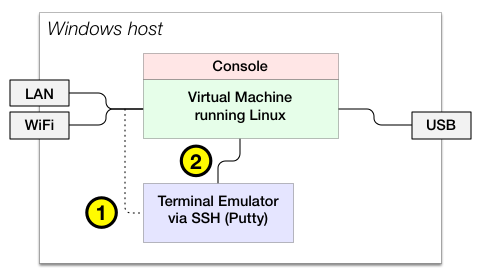
When you install Linux and start the VM for the first time, you’ll get a console window attached to the VM. Inside this window it’s all Linux, but there are still some issues:
- the VM is (probably) not yet connected to the network, so it can’t reach internet
- the VM does not see any attached USB devices either, i.e. no FTDI interfaces
- there is no way to exchange data or files between the host system and the Linux VM
- the console is a bit limited, with Linux system messages interfering with normal use
Each of these should be relatively easy to solve and configure. So let’s get on with it, eh?
Internet access
For networking, we need to define a (virtual) network interface in VirtualBox. This can be done in settings – here is an example of what it should look like:
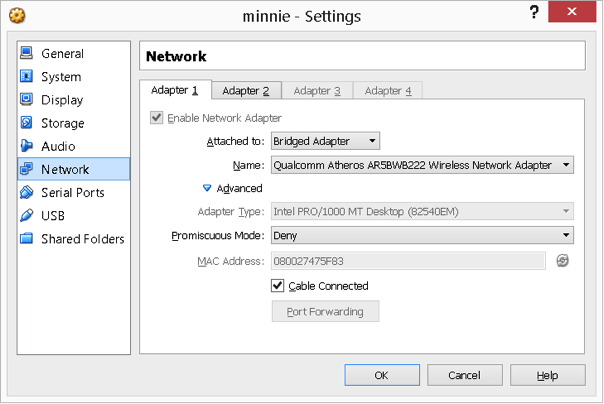
You can test for network connectivity and internet access using this command in Linux:
$ ping -c 3 google.com
If no errors are reported, you’re good. One of the first things to do when connecting to internet for the first time, is to request the latest updates for Linux:
$ sudo apt-get update && sudo apt-get upgrade
(press return to accept the latest updates, if you get a question about this)
Ignore the console
The console is a bit limited, which is why the Getting Started page included the advice to download and install Putty. Using Putty, we can set up a terminal session to Linux, using a normal window-based application, which can be resized, set to full-screen, and connect to other systems as well – using the encrypted SSH support available in most Linux setups.
One approach would be to simply connect into the VM using that network connection we just set up. It would work, but it’s a bit inconvenient: if there is no network access, or if you switch between LAN and WiFi connections, then you may not be able to connect.
A far better option is to create a second network interface in the VM, which remains local inside Windows, i.e. no actual netweork interface involved at all. Here is the VBox setup:
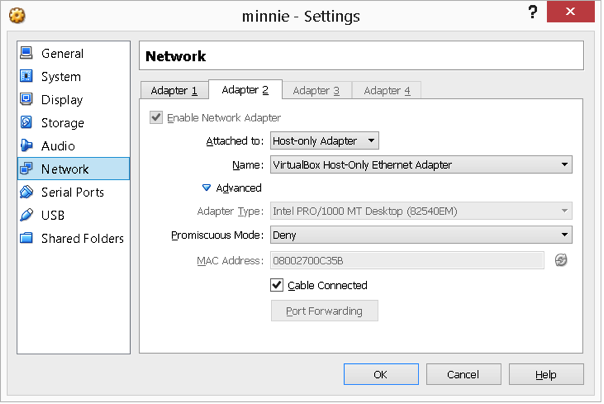
Note that this is a (virtual) “Host-only Adapter”. It’s not tied to a real network interface.
We need to set up networking on the Linux side, and find out the assigned IP address, so in the console, enter the following:
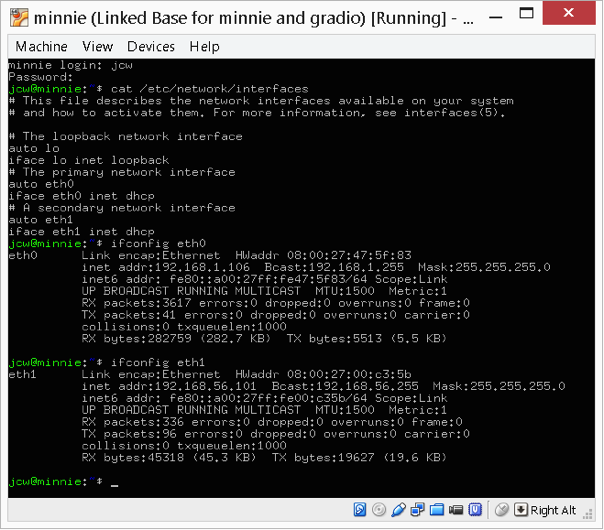
If /etc/network/interfaces shows something different from this, you’ll need to edit it. One way to do so is with the following command:
sudo nano /etc/network/interfaces
Double-check all the values, save the changes, and reboot Linux (type: “sudo reboot“).
The two “ifconfig …” commands shown above are a quick way to find out if both network interfaces have been properly set up in Linux, and what IP addresses they were given.
Now we can configure Putty to connect to the VM that way, and save the configuration for easy re-use later. Here’s a configuration setup called “minnie”:
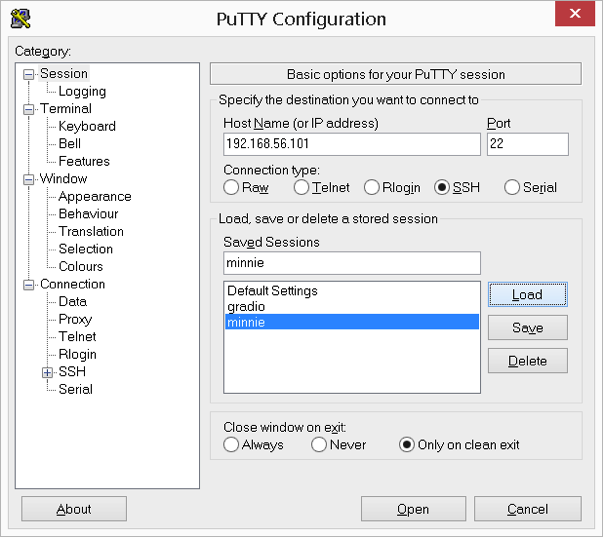
Note that the IP address matches the one assigned to the 2nd interface by VBox.
Save the changes first, then click on the “Open” button. You’ll see this after logging in:

Congratulations, you have connected Putty as terminal window to the Linux VM over SSH.
A benefit of this setup is that it works even when you are off-line, or running Windows’ firewall to constrain outside network access, since this uses a direct connection to VBox.
Sharing files
If you intend to edit your source code from Windows, then a shared disk is the way to go: we can create a shared area in VBox, which is placed in Windows, but which the Linux VM can access as if it were an attached USB drive. It’s well worth the effort to get this going:
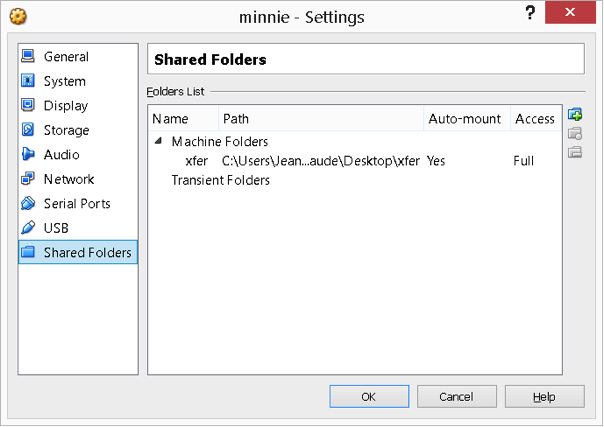
In Linux, we can streamline things further, so that this USB drive gets auto-mounted every time Linux boots up. To do this, install the “usbmount” package:
sudo apt-get install usbmount
Then, add yourself to the “vboxsf” group to get the proper access permissions:
sudo usermod -aG vboxsf <your-user-name>
And lastly, log out and log back into Linux to refresh to these new group permissions.
Now, the same files on Windows will be shared with Linux as /media/sf_xfer/....
USB Devices
Lastly, we should make it really easy to plug in an FTDI interface (or JTAG debugger, or whatever) and have it appear as device in Linux, not Windows. Again, in VBox:
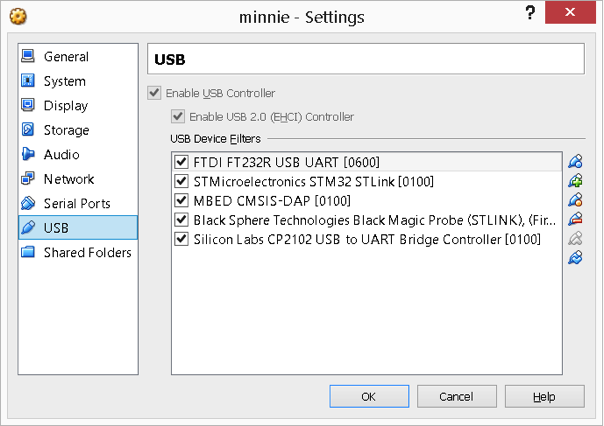
The way to add an entry, is to insert the FTDI board and click on the “USB/+” icon. You’ll get a pop-up to select the device. Then simply accept the suggested values and it’ll be saved.
Now every time you plug the device in, it will be attached to the Linux VM, thus completely bypassing the Windows host. No need to install FTDI drivers in Windows.
Security
The configuration described here should be as secure as before. Linux is reachable from the outside, but only through SSH if you haven’t opened up more ports. SSH is secure if you choose your login passwords properly – and even if you don’t, any damage will be confined to Linux, which has the same access rights as any other system on your (local!) network.
However, if you want to lock down things 100% tight, you’ll need to do two more things: 1) set up Putty to use a public/private key pair for logging into your own account on Linux, and 2) disable all logins over SSH using only a password. That way, there’s no way into Linux other than via Putty (which requires physical access to your machine), or if someone gets hold of your public plus private key files, stored in Putty.
To conclude this setup guide: there is unfortunately some tinkering involved in getting all of the above steps just right, but the pay-off is a well-integrated setup, whereby Windows remains as is, with VBox and Putty running inside, and Linux is fully tied into the network and any USB devices you wish to use from there.
With this approach, there is no need to ever install USB drivers in Windows, if all you want to do is use that particular USB device only from the Linux VM. There is of course a need to set things up on Linux, but in general Ubuntu is pretty good at recognising USB hardware.
So there you have it: total isolation, plus controlled screen, USB, and network access.
[Back to article index]